Select Audience
Effortlessly choose your target audience for broadcast messages on AiInbox.
To choose your target audience for the broadcast message, you can either upload contacts from an Excel file or select from a contact group in AiInbox.

Let’s take a closer look at both options:
Upload Contacts from Excel
Send personalized messages to the contacts in your Excel spreadsheet.
Prefer to read? Check out the guide below ⬇️
Click on Upload Contacts button to download the sample file. Download the Sample file. Restructure your data (the Names and the Phone number) as per the Sample file.
Example File:
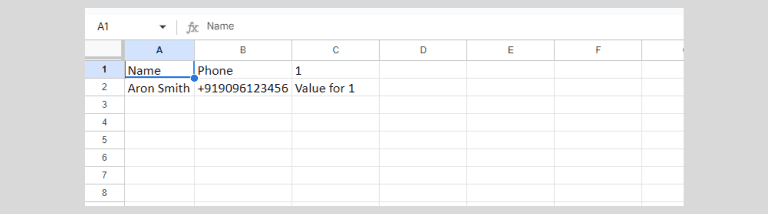
Column Name 1 (as shown in the screenshot) corresponds to the variables defined in your message template. For instance, if your message template includes four variables such as {{name}}, {{orderId}}, {{price}}, and {{brandName}}, the sample file would look like this:

Once the data is restructured according to the sample file, it should appear as follows:

2- Once you have restructured the data according to the sample file, upload the Excel file to AiInbox. Set the marketing opt-in status and select the phone number format to proceed with the broadcast.
-
If your WhatsApp template includes predefined variables, you can map them and add payloads for the buttons in the template (useful for triggering bot flows based on customer responses).
-
For templates with a CTA button and a dynamic URL, you can select one variable to create a personalized link for customers to access their information. Only one variable can be appended to the URL.
-
If your WhatsApp template contains media, you can either add a variable or upload the media file directly from your device.
Select from Contact Group
Create a new contact group or select an existing one to send personalized messages.
Prefer reading? Check out the detailed guide below ⬇️
1- Click the Create Group button to create a contact group. Use the Filter option to sort contacts by email, tags, marketing opt-in, or other available fields. Assign a name to the new segment and click Create Group.
1- You can also choose from existing groups by searching and selecting the one you need.
Map the variables
Once you upload or select a contact group, you can preview the data to ensure it maps correctly to the appropriate values or variables.
1- If your WhatsApp Template includes predefined variables, you can map those variables and add the payload for the buttons in the template (if you wish to trigger a bot flow after receiving a response from the customer).
Add Button Payload
Button payloads enable the integration of interactive buttons within your messages, enhancing user engagement with effective calls to action (CTAs).
1- If your WhatsApp template includes a Call-to-Action (CTA) button that links to a dynamic URL, you can use it to send a customizable web address tailored to your customer’s needs.
2- If your WhatsApp template includes media, you have the option to add:
- Variables: Use a map for dynamic content and bot flows.
- Dynamic URLs: Generate personalized CTA links.
3- If your WhatsApp template includes Quick Reply buttons, you can trigger a bot by entering the desired bot intent in the button payload field.
After completing the variable and media mapping, we will move on to reviewing and configuring the Reply-to settings to send the broadcast.